Using a laptop as your screen to view the gameplay is quite an uncommon query; chances are that your TV is not working properly. So let’s check out everything about the How to Use Laptop as Monitor for PS4 article. Waiting for it to be fixed can take several days, but you can not wait to finish your game. But you have no idea How to use Laptop As Monitor for PS4. This How to Use Laptop as Monitor for PS4 guide is all you need if you are also going through a similar situation.
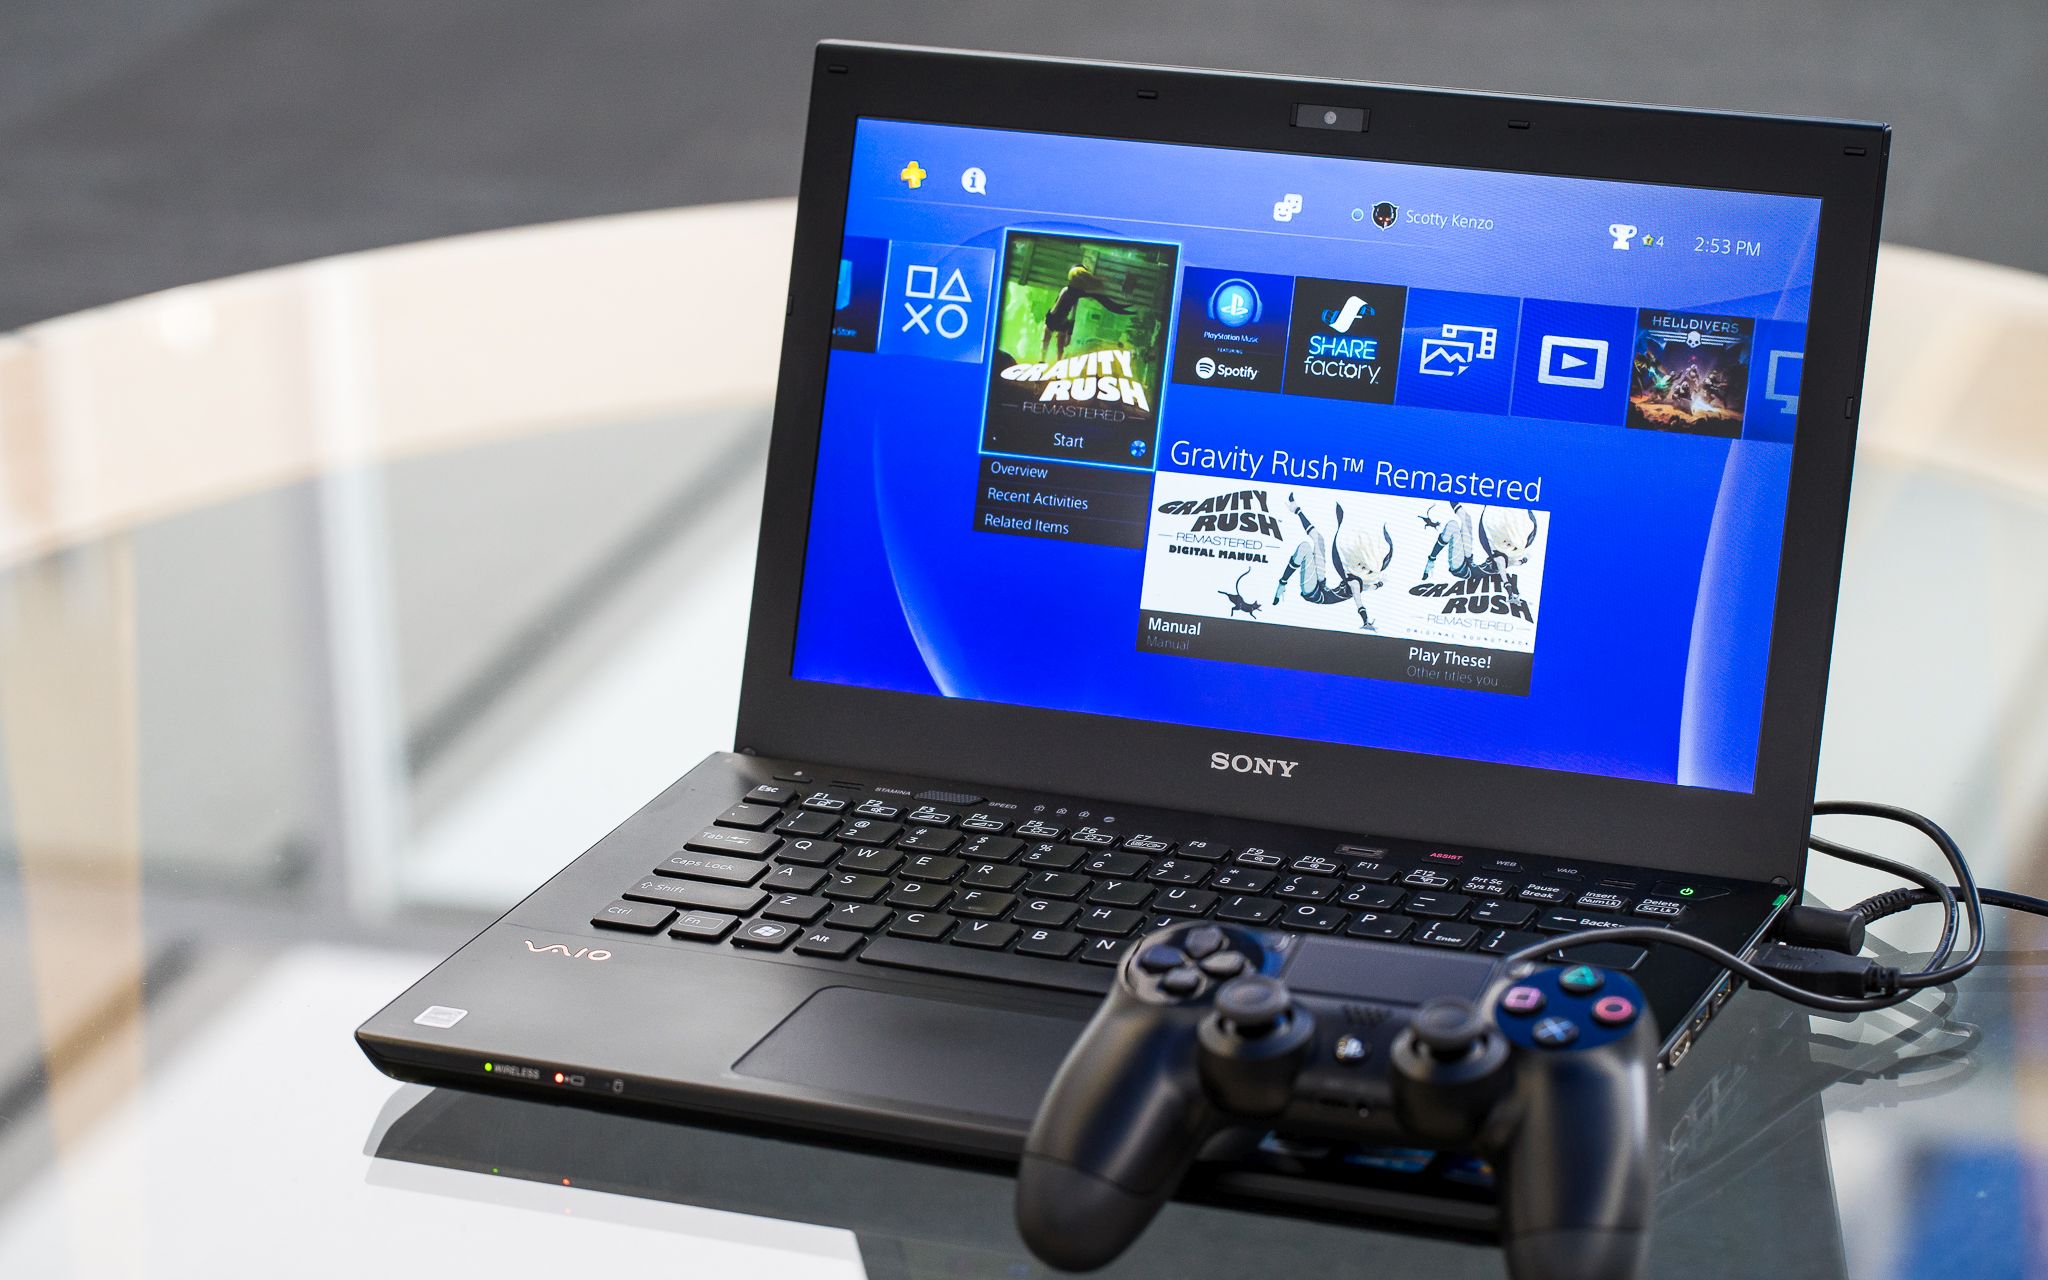
Have you ever had the urge to play your favorite PS4 game but your TV was on and someone else was watching? Or perhaps you want to play on a smaller screen for a more personal gaming experience? Regardless of the cause, using your laptop as a PS4 monitor can be a great solution. Here is a step-by-step How to Use Laptop as Monitor for PS4 explanation of how to perform this gaming magic.
🚀 Explore our in-depth guide on “How to Use Laptop as Monitor for PS4” to learn how to open the door to an unmatched gaming experience. This How to Use Laptop as Monitor for PS4 guide is your golden ticket to escaping the confines of a single screen and discovering new horizons in your virtual adventures, whether you’re an experienced gamer or a curious newcomer. 🎮✨
Prerequisites –
1.1. Equipment Needed
- PS4 Console
- Laptop (Windows or Mac)
- HDMI cable
- Video Capture Card
- Internet Connection
1.2. Software Required
- PS4 Remote Play Application
- Appropriate Drivers for Video Capture Card
(Guide) How to Use Laptop as Monitor for PS4
To understand how to use Laptop as monitor for PS4, we have given you two very common ways. In the first How to Use Laptop as Monitor for PS4 method, we will demonstrate the method using the capture card, while the second method uses the remote play application. Now let’s get to know more about this How to Use Laptop as Monitor for PS4 guide.
How to use Laptop as Monitor for PS4 using the Capture Card
So the first way most users prefer is using the capture card to stream the game onto their Laptop Monitor. Before proceeding with this How to Use Laptop as Monitor for PS4 method, you will need some things, which are given below.
Things You Need
- HDMI Cable
- Capture Card
- Laptop With USB C Port
- USB A TO USB C cable
- USB A TO USB B cable
- OBS Studio Freeware Program
Once you have all the abovementioned resources, you can now follow the How to Use Laptop as Monitor for PS4 steps below.
- STEP 1. Make sure the Laptop is Turned on
**NOTE: The Output portion of the Capture card will be connected to the Laptop
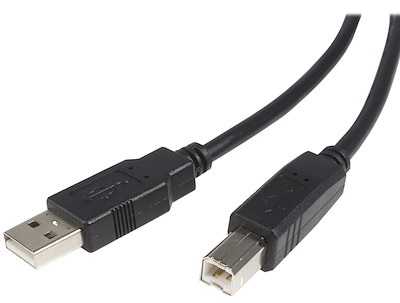
and the Input portion will be connected to the Console.- STEP 2. Take the USB A to B cable and connect the Capture Card to the Laptop for Power (USB B will be connected to the Capture Card and USB A will be connected to the Laptop)
- STEP 3. Take the HDMI cable and connect it to the Capture Card, connect the other end to the output port of your Console
- STEP 4. Now take the USB A to USB C cable and connect the USB A to capture card and USB C to your Laptop
- STEP 5. Now go to the Start menu of your PC and open up the Web browser
- STEP 6. Now search for the OBS studio program and download it to your system

- STEP 7. Once downloaded, install the Program
- STEP 8. After OSB studio is installed, run the program; once the program opens up
- STEP 9. At the bottom, under the scene, click on the + icon
- STEP 10, just beside you, will see the Source window. Click on the + icon choose Capture Device and select your Capture Card
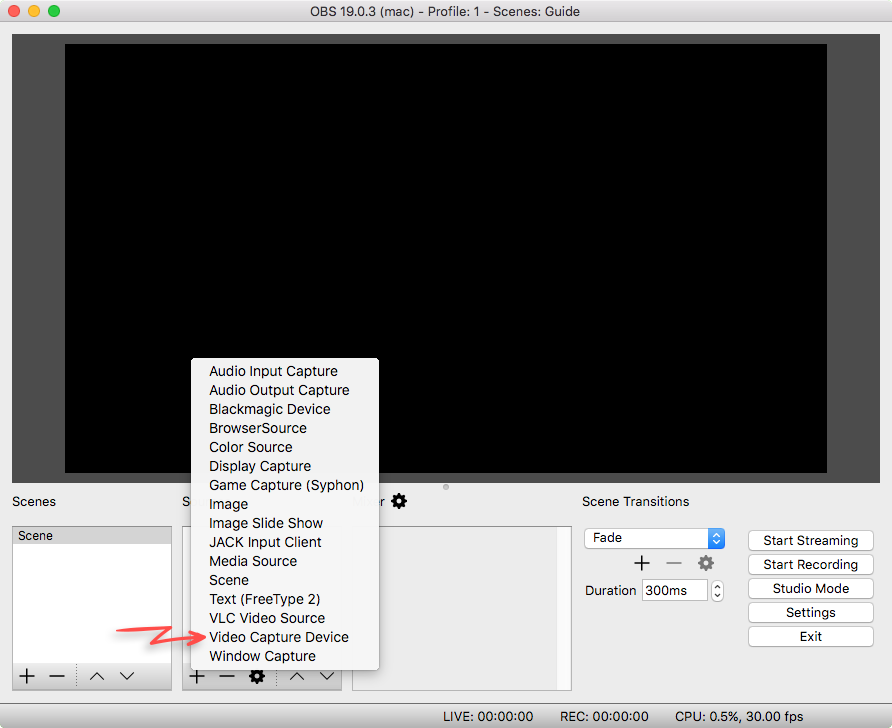
- STEP 11. Now head to the Program window and set it to full screen, now enjoy PS games on your laptop monitor
How to use Laptop as Monitor for PS4 using the Remote Play
So this How to Use Laptop as Monitor for PS4 method uses the Remote Play application to display the PS4 screen on your laptop screen. You will find all the How to Use Laptop as Monitor for PS4 steps of downloading, installing, and how to use it.
Downloading and Installing Remote Play
- STEP 1. While you are on the Desktop window, launch the Web browser
- STEP 2. Once the web browser is opened up, simply search Playstation Remote Play and choose the first link or directly open the website by clicking here
- STEP 2. Once you are on the Playstation Remote Play website, scroll down to the bottom and click on the link mentioned in the Picture below
- STEP 3. Again scroll down a little, and here click on the Download link for your desired OS, for instance, we will be downloading the Windows version

- STEP 4. Within a second, the executable file of PS Remote Play will be downloaded to your PC
- STEP 5. Head to the file and double-click to begin the installation process, follow the onscreen instructions and install the program
- STEP 6. Now open up the application
Getting Started With Remote Play
- STEP 1. Once the program opens up; at the bottom left, click on the Settings button
- STEP 2. Under the Resolution from the drop-down menu, choose 1080P
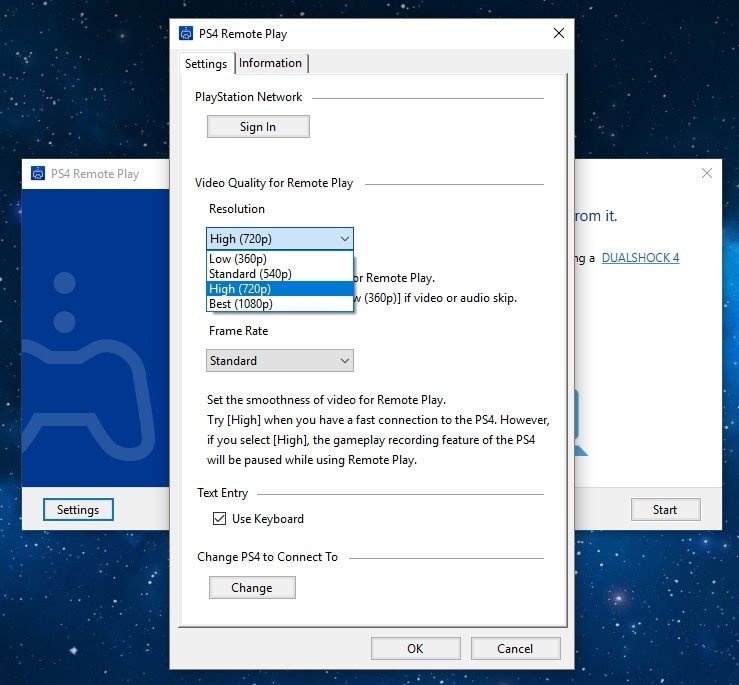
- STEP 3. Under the Frame rate from the drop-down menu, choose High
- STEP 4. Close the window by clicking OK
- STEP 5. Now click on Start, then click on Confirm and Continue
- STEP 6. You will now be asked to enter your login details; make sure to enter the same login details that you are using on the Console
- STEP 7. Directly connect your PS4 controller to your laptop using the USB cable
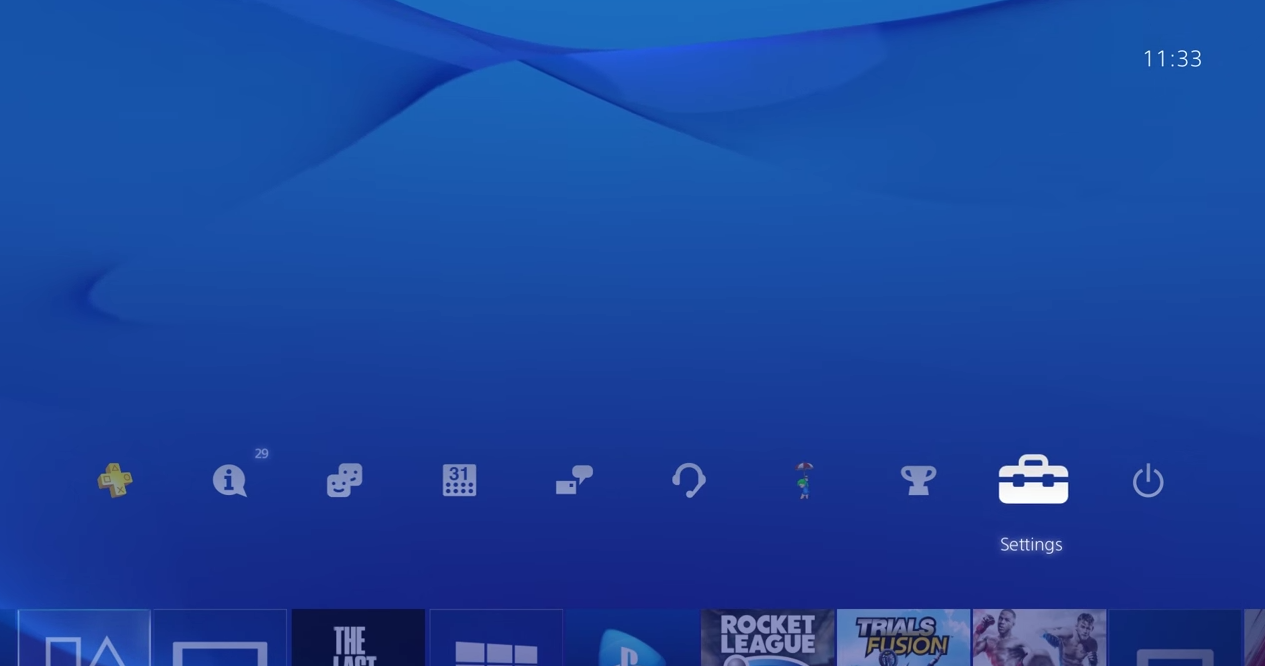
- STEP 8. Head to your PS4 main menu, scroll to the extreme right and click on Settings
- STEP 9. Now scroll down to Remote Play Connection Settings
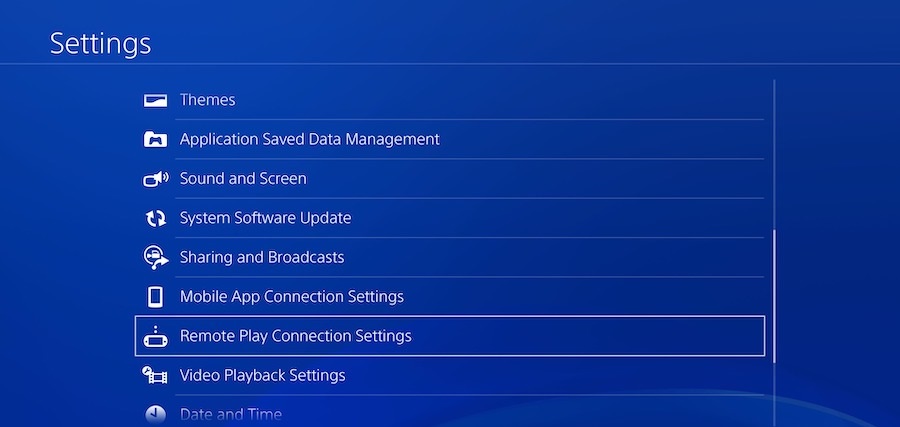
- STEP 10. Now click on Add Device; as soon as you click on Add Device, a numeric Code will be generated
- STEP 11. Memorize the Code and head to the Remote Play App on the PC
- STEP 12. Click on Register Manually and put the Code there; now click on Next
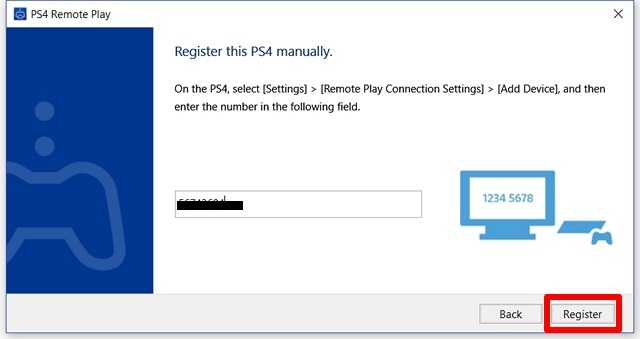
- STEP 13. Now you can see that your PS4 screen is now live on your Laptop
You can now play your favourite games without any issues on the Laptop.
Enjoying the Gaming Experience
Once everything is set up, you can use your laptop as a monitor to fully enjoy your favourite PS4 games. Always keep in mind that a steady internet connection is necessary for an enjoyable gaming experience. For a better gaming experience, adjust your laptop’s settings, including the screen brightness and speaker volume.
Conclusion:
So this is all about the How to Use Laptop as Monitor for PS4 article guide. In the above How to Use Laptop As Monitor for PS4 guide, we have given you the How to Use Laptop as Monitor for PS4 steps on two of the very common methods of How to use Laptop As Monitor for PS4. Hopefully, you will now be able to play games on your laptop. Hope you like this How to Use Laptop as Monitor for PS4 from here now.
Utilizing your laptop as a monitor for your PS4 can not only be a convenient alternative but also open up new dimensions in your gaming world. Whether you’re a gaming enthusiast seeking a more personal experience or facing temporary TV unavailability, this How to Use Laptop as Monitor for PS4 guide has got you covered. So, gather your gaming supplies and enter a nonstop gaming paradise. Hope you enjoy checking this type of How to Use Laptop as Monitor for PS4 content.
For more helpful guides like this How to Use Laptop as Monitor for PS4, follow us. If you enjoy reading the How to Use Laptop as Monitor for PS4 then please do share How to Use Laptop as Monitor for PS4 with others as well also. Thank you!
People Also Ask
1. Can Any Laptop be Used as a Monitor for PS4?
Any laptop with an HDMI port and the necessary system specifications for the PS4 Remote Play app can serve as a PS4 monitor. Make sure your laptop has enough RAM, processing speed, and resolution for a more enjoyable gaming experience.
2. Is It Possible to Use the Laptop as a Monitor Without a Capture Card?
While using a video capture card is a popular method, alternatives like the PS4 Remote Play application enable users to use their laptop as a monitor without needing a capture card. To prevent lag, however, when using Remote Play, a strong and reliable internet connection is essential.
3. Will Using My Laptop as a PS4 Monitor Affect Gaming Quality?
The specifications of the laptop and the reliability of the internet connection have a significant impact on the gaming quality. Higher-end laptops with better displays and a strong internet connection will generally provide a superior gaming experience.
4. Can I Use my Wireless PS4 Controller While Playing on the Laptop?
Absolutely! PS4 controllers can be connected to the laptop wirelessly or with a wired connection using a USB cable and Bluetooth. Make sure the Bluetooth on your laptop is turned on and that the controller is properly paired.
5. Is There Any Risk of Damaging the PS4 or Laptop While Connecting Them?
The described approaches to connecting the PS4 to a laptop are generally secure. To avoid any potential harm, it is essential to strictly adhere to the instructions and use premium cables and capture cards.
6. Can I Still Use the PS4 Remote Play Application if My PS4 and Laptop are on Different Networks?
The PS4 Remote Play app is compatible with various networks, yes. However, for optimal performance, it is recommended that both devices be connected to the same local network.
7. Is the PS4 Remote Play Application Free to Use?
On the official PlayStation website, you can download the PS4 Remote Play app without charge. There are no additional charges for using the application to play your PS4 games on your laptop.
8. Can I Play All PS4 Games Using My Laptop as a Monitor?
The majority of PS4 games are compatible with the Remote Play feature. However, there might be restrictions for games that don’t support streaming. For compatibility information, consult the game’s specifications or the PlayStation website.
9. Will Using My Laptop as a Monitor for PS4 Affect the Warranty of Either Device?
Using your laptop as a monitor for PS4 via legitimate methods like the PS4 Remote Play application or a capture card does not void the warranty of either device. Make sure to adhere to official instructions and utilize approved hardware.
10. How Can I Optimize My Gaming Experience When Using a Laptop as a Monitor?
Make sure your internet connection is steady, adjust the streaming quality to your bandwidth, use a high-quality laptop display, connect external speakers or headphones for better audio, and customize your laptop’s settings like brightness and volume to maximize your gaming experience.
You can gain the knowledge you need to use your laptop as a PS4 gaming monitor by diving into these How to Use Laptop as Monitor for PS4 FAQs, paving the way for countless hours of immersive gaming enjoyment.




I envy your work, thanks for all the great articles.