

In this troubleshooting guide, we will go through solutions to fix Skyrim Loading Screen issue when playing the game on PC. The reason why this issue occurs is majorly due to the problematic mods, insufficient memory on your system or some improper configuration. In this guide we have targeted this issues and given you best solution to tackle the problem.

Similar Types of Skyrim Loading Screen Issues
- Skyrim stuck on loading screen fast travel
- Skyrim stuck on loading screen reddit
- Skyrim infinite loading screen fix mod
- Skyrim stuck on loading screen xbox one
- Skyrim stuck on loading screen ps4
- Skyrim stuck on loading screen ps3
- Skyrim stuck on loading screen xbox 360
- Skyrim se infinite loading screen on star
How to Fix Skyrim Loading Screen Problem Issue Quickly
Now that you know some of the most common causes behind Skyrim Loading Screen issue. Follow the methods to fix the issue and begin your game journey.
1. Tweak the SKSE.ini File
One of the main reasons that your screen is stuck on the loading screen is insufficient memory. If you are using SKSE then we suggest you follow this method. If you are not using SKSE we suggest going to the next method. Now let’s start with the steps.
- STEP 1. You have to first reach the installation folder of the game, this can be done by right click on the desktop shortcut and click on the Open file location
**NOTE: Here is one important thing to know that if you are a Steam user
then you can continue following the steps.
If you are a nonsteam user then you can jump directly to STEP 5. of this method.- STEP 2. Launch your Steam client and head to the Library
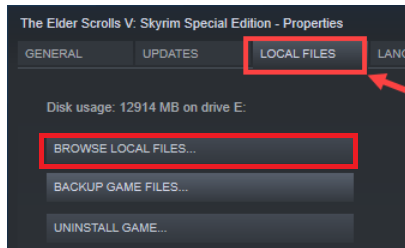
- STEP 3. Now right click on Skyrim and click on Properties
- STEP 4. In the properties window you have to click on Local files, and then click on open installation folder
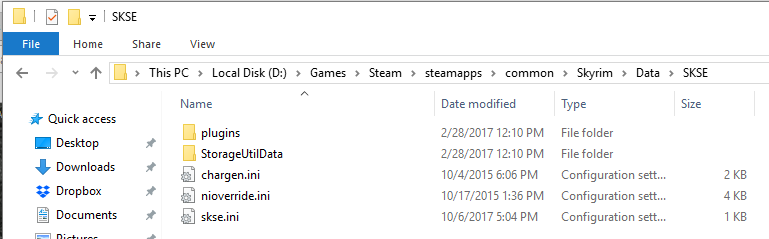
- STEP 5. Once you are in the Installation folder navigate to Data then SKSE
- STEP 6. Inside the SKSE folder, you will have to find the skse.ini file
- STEP 7. We now have to edit this file so Right-click on the file and open it with Notepad
NOTE: There are chances that you will not find the file, so create a new text document and name it skse.ini. Open the file
- STEP 9. Now copy the below-mentioned lines and paste them inside the document
[General]
EnableDiagnostics=1
ClearInvalidRegistrations=1
[Display]
iTintTextureResolution=2048
[Memory]
DefaultHeapInitialAllocMB=768
ScrapHeapSizeMB=256
- STEP 10. Now save the file, you can now try running the game
In case if it does not work.
For Most people, the above steps will work just fine, but there are chances that some of you still face the issue. If that is the case you have to follow the steps below.
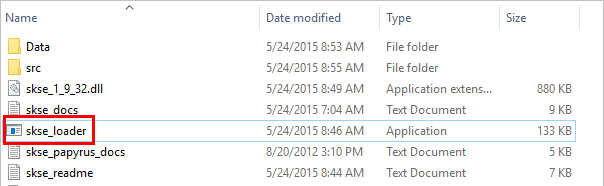
- STEP 1. There is a slight possibility that for some of you the issue might still occur, in this case, you have to additionally make changes to the skse_loader.exe
- STEP 2. Head to the main Skyrim Folder and Locate the skse_loader.exe
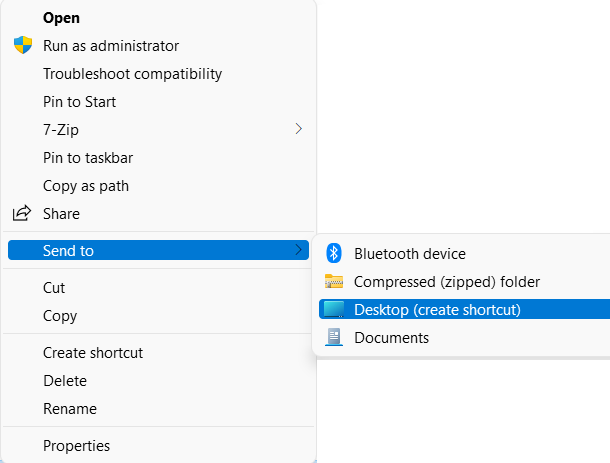
- STEP 3. Now right-click on the file and from the properties click on create a shortcut
- STEP 4. Close all the windows and head to the Desktop, now right-click on the desktop shortcut that you have created
- STEP 5. Now click on Properties and make sure that you are on the Shortcut tab
- STEP 6. There in the target area, add ‘-forcesteamloader’ as in the picture below and save then save the changes
Now you can try running the game.
2. Edit your Skyrim Preferences File
So this method is equally helpful if you have not installed SKSE, also if you have tried the above method and it does not work.
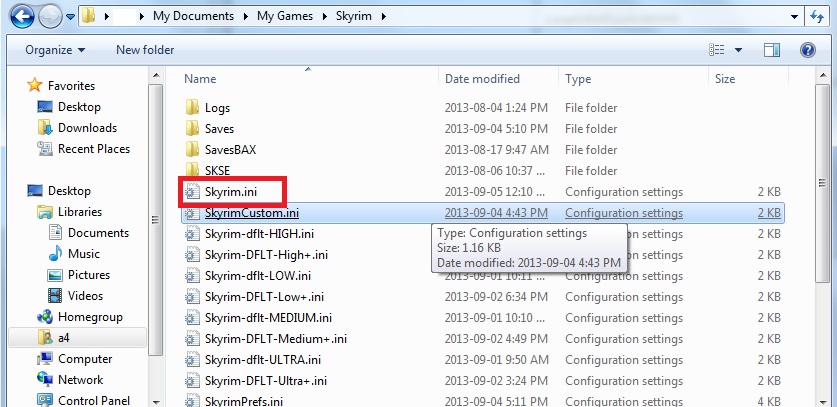
- STEP 1. To make this method work this time you have to edit the skyrim.ini file
- STEP 2. Reach the following location
C: > Users > Your Account’s Name > Documents > My Games > Skyrim
- STEP 3. Inside the folder, you will find the ‘skyrim.ini’ configuration file
- STEP 4. Now Right-click the skyrim.ini and from the properties click open it with Notepad.
- STEP 5. Once the file is opened press the Ctrl + F key to open the search
- STEP 6. Inside the search Type “fPostLoadUpdateTimeMS” and hit enter
- STEP 7. Once you find the text there will be a value associated to it change it to 2000.0
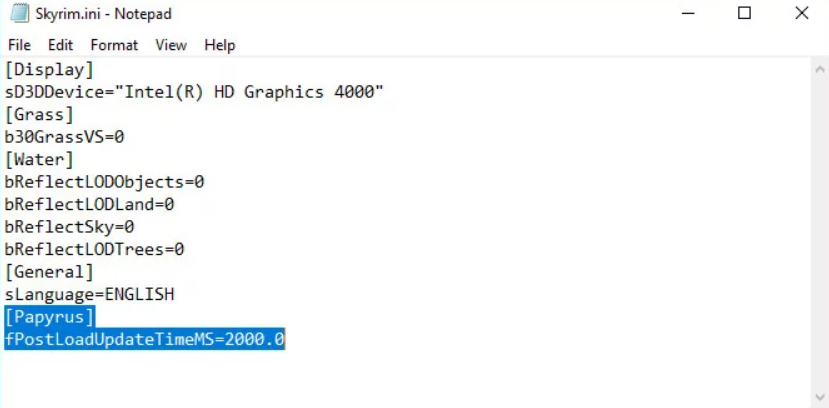
- STEP 8. In case you do not find the line make sure to add it
- STEP 9. Now save the file, and try to run the game
- STEP 10. If the issue still pops up, again open the .ini file and edit the MapMenu like below, in case if there is no MapMenu you have to add it like the below picture
[MapMenu]
sMapCloudNIF=0
bWorldMapNoSkyDepthBlur=1
fWorldMapNearDepthBlurScale=0
fWorldMapDepthBlurScale=0
fWorldMapMaximumDepthBlur=0
fMapWorldYawRange=3600.0000
fMapWorldMaxHeight=130000.0000
fMapWorldMinHeight=5000.0000
3. Use the Registry Editor
If both the methods fail to work then chances are that the issue is not with the game file or the game configuration files. The issue is actually with the windows registry. To fix it follow the steps below.
- STEP 1. In the start menu, search for regedit and open it
- STEP 2. Once the registry editor opens navigate to the following path
HKEY_CURRENT_USER\Control Panel\Desktop- STEP 3. Once you reach the Desktop registry under it you will find the HungAppTimeout
- STEP 4. If it does not exists you have to create a new entry; simply right click on empty and click on New > String Value
- STEP 5. Name it HungAppTimeout, nwo right click on the HungAppTimeout
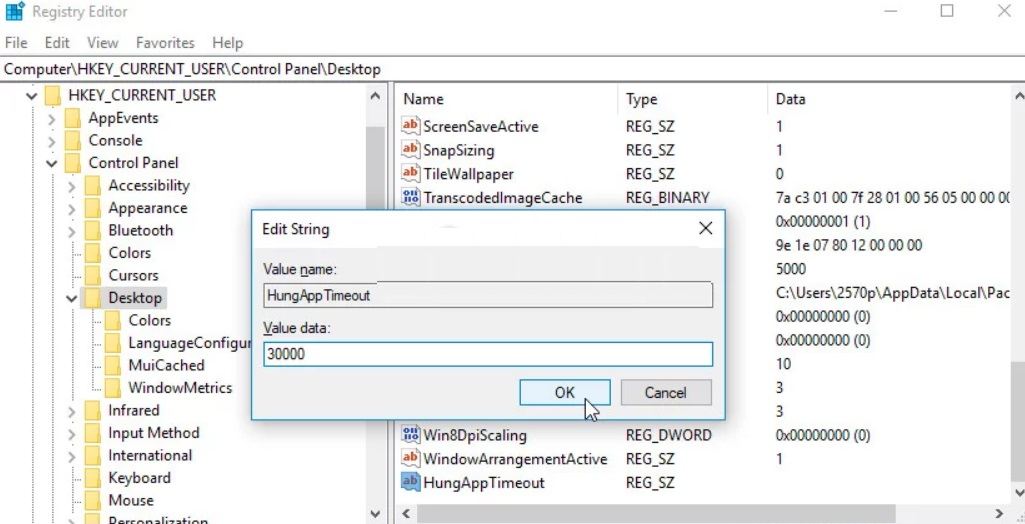
- STEP 6. Click on the Modify option under the Value data section change the value to 30000 STEP 7. Finally, apply the changes
- STEP 8. Now restart the system and your issue will be fixed
Conclusion:
In the above guide we have seen some of the troubleshooting method to fix Skyrim Loading Screen issues. We have talked about the possible causes of this issue and majorly the solutions to fix this issue.
For more guides follow us. Thank you!


